Welcome to Highlight Monday. I am so glad that you are spending this time with me in my craft room. I also hope you have had a great weekend. My weekend was very restful. I know we lost an hour with Daylight Saving Time but you would not know it with all the sleep I got. How do you feel about Daylight Saving Times? I seem more confused by what time it is because it gets dark later. I am finding I am staying up long and sleeping in later, which when you think of it is not a bad idea.
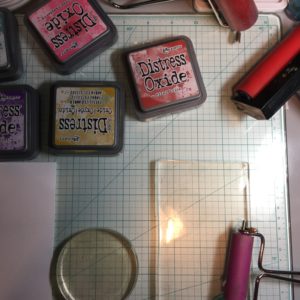
I love doing backgrounds for my cards. My most loved technique to do backgrounds is with a Gel Plate. Today is what we are going to do make backgrounds with a Gel Plate. Gel Plate is a gel-like material that you apply ink, paint, stamps, and stencils to make the backgrounds. One of the things I like about the Gel Plate is no two backgrounds come out alike. Gel Plates come in different shapes. The shape I love to use the most is the small circle Gel Plate. Some people make their Gel Plate, I on the other hand brought mine when they were on sale. Here are Gel Plates that I have:

Let’s grab a cup of coffee and let’s make backgrounds using my Gel Plate.

The materials you can use with the Gel Press are unlimited. You can use bottle caps, string, bubble wrap. tools that are made for the gel plate, stamps, and stencils just to name a few. Anything can be used as long it does not scratch or puncture the gel plate. The materials we will be using today are:
Stamps
Bubble wrap
Tools made for the gel plate
Bottlecap
Stencils.
Copying Paper
Card Stock
Brayers (small and large)
Inks
Paints
Gel Plates
Scape piece of paper
Water
Rag
Set up the workspace:
- Get all your materials out that you will be using.
- Get the Gel Plate out and next to it have a scrap piece of paper.
- Have a bowl of water and a rag on your workspace.
- Have the brayers next to Gel Plate.
Gel Plate tips:
- When spreading the ink or paint make sure you take a brayer and go with an upward sweep motion.
- Always allow your layers to dry before applying another layer.
- Make sure you use the water to clean up the brayer, stencils, and stamps.
- For an easy clean up put a little Oil Soap in the water.
- Using inks makes a softer background than paints.
- Leaving a little ink or paint on the Gel Plate between backgrounds will give it a little character.
Who is ready to try to make some backgrounds? I know I am!
Background number one:
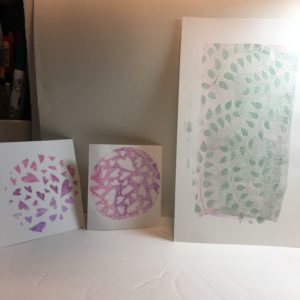
This background is with inks and stencils. First I applied blue ink on the bottom of the Gel Plate, overlapping blue with purple ink, and then with overlap purple with red ink. Then I applied a stencil onto the inks. While it is still wet lay a piece of copying paper on the Gel Plate and remove the ink off the Gel Plate. This is how it turned out:
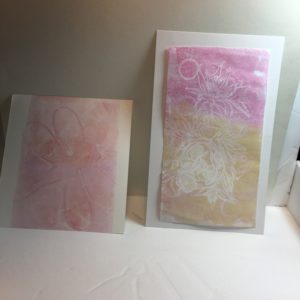
The second background is using paints. The heavy body paints work best but you have to have to let the paints dry between layers. I started white paint let it dry before applying yellow paint and put a floral stamp. Then put a piece of card stock to the gel plate to pull off the print. This is how it turned out:


These are some examples but I want you to take these materials and Gel Press and let your imagination and create your backgrounds. Try some new materials, inks, and paints. You will be surprised at the background you will create.

9 Responses
I don’t think the title of your article matches the content lol. Just kidding, mainly because I had some doubts after reading the article.
Your point of view caught my eye and was very interesting. Thanks. I have a question for you.
I was reading some of your content on this internet site and I believe this internet site is real informative!
Keep on posting.Raise your business
generic priligy You can book your appointment online or give one of our team members a call at 312 444 1111 to schedule over the phone
order priligy Because sometimes it takes the cops forever to get there
[url=https://fastpriligy.top/]priligy amazon[/url] The application of LC HRMS provided the necessary confirmation due to the mass accuracy and structural information obtained during the fragmentation experiment
In cardiomyocytes exposed to hypoxia, silencing of G6PD prevented antiapoptotic signaling in response to benfotiamine, indicating that the beneficial effects of benfotiamine on cardiomyocytes may be due to increased activation of G6PD can you get cytotec without rx
Your point of view caught my eye and was very interesting. Thanks. I have a question for you.
Thanks for sharing. I read many of your blog posts, cool, your blog is very good.